MCP Basics (MCP Apps Edition)
With the JAXA Earth API for JavaScript, you can also develop an MCP (Model Context Protocol) for integration with generative AI. In this tutorial, you will build a Streamable HTTP MCP Apps. This makes it possible to run the MCP server (the source code below) and the MCP client on separate machines and have them communicate over the network.
However, the source code below omits security measures such as HTTPS support and user authentication, so it is intended for use within a trusted local network. To publish it on the internet so that an unspecified large number of users can access it, separate security measures are required.
This explanation assumes that you understand the STDIO method and the Streamable HTTP method, so if anything is unclear, please refer to the following.
The content of this explanation has been verified to work in the following environment (as of 2026.5).
- Windows 11
- Node.js (v22.20.0)
- TypeScript (5.9.3)
- Visual Studio Code Insiders (version 1.122.0-insider)
- GitHub Copilot Free plan
Preparing the Source Code
Download the complete set of source code from the link below, extract the ZIP file, and save it to any folder (hereafter referred to as the "project root").
Complete MCP sample code (Japanese Version Only)
The sample code includes the following files.
- package.json //A Node.js file describing information about this package
- tsconfig.json //A TypeScript configuration file for compiling the MCP server part
- vite.config.ts //A Vite configuration file for compiling the UI part
- src-sv/ //Configuration files for the MCP server part
- index.ts //A file required to run the MCP server
- createMcpServer.ts //A file with a function that creates the McpServer
- getElevationImage.ts //A function that returns an image of elevation data using the JAXA Earth API
- jaxa.earth.esm.js //The JAXA Earth API module file
- jaxa.earth.esm.d.ts //The type definition file for the JAXA Earth API module
- src-ui/ //Configuration files for the UI part
- index.html //The HTML file of the UI web app
- script.ts //A file containing the JavaScript code that runs within index.html
In MCP Apps, src-ui is added compared to the Streamable HTTP method. The web app inside it can also be
called from generative AI.
The UI definition part in createMcpServer.ts is as follows.
When generative AI requests a UI resource, index.html is returned. If the generative AI does not
support MCP Apps, it is ignored, and only the function that operates as a regular Streamable HTTP
MCP is enabled.
import { registerAppResource, RESOURCE_MIME_TYPE } from "@modelcontextprotocol/ext-apps/server";
import { McpServer } from "@modelcontextprotocol/sdk/server/mcp.js";
import fs from "node:fs/promises";
import path from "node:path";
//(omitted)
export default (): McpServer => {
//Create the MCP server
const server = new McpServer({
name: "jaxa-earth-api",
version: "1.0.0",
});
//Define the URI of the UI resource
const resourceUri = "ui://get-elevation-image/ui";
//(omitted)
//Define the resource
registerAppResource(
server,
resourceUri,
resourceUri,
{ mimeType: RESOURCE_MIME_TYPE },
async () => {
//For when the compiled index.html is also in the build folder (= import.meta.dirname), which is the compilation output folder of this createMcpServer.ts
const text = await fs.readFile(path.join(import.meta.dirname, "index.html"), "utf-8");
return {
contents: [{
uri: resourceUri,
mimeType: RESOURCE_MIME_TYPE,
text,
}],
};
},
);
return server;
}
Installation and Compilation
Open a terminal (command prompt) at the project root and run the following to install the required modules.
npm i
Next, run the following in the terminal. As for npm usage, start can also be written in
the shorter form npm start.
npm run start
This automatically runs the following three processes.
- Compilation of the
src-uipart by Vite (can also be run on its own withnpm run build-ui) - Compilation of the
src-svpart by TypeScript (can also be run on its own withnpm run build-sv) - Starting the MCP server (can also be run on its own with
node ./build/index.js)
* Even while the MCP server is running, if you edit a file in
src-ui, you can compile only the UI part by opening another terminal and runningnpm run build-ui.
If a display like the following appears, the MCP server has been compiled and started successfully.
> jaxa-earth-api@1.0.0 start
> npm run build-ui && npm run build-sv && node ./build/index.js
> jaxa-earth-api@1.0.0 build-ui
> npx vite build
vite v7.3.1 building client environment for production...
✓ 142 modules transformed.
[plugin vite:singlefile]
[plugin vite:singlefile] Inlining: index-Bkm2ptAA.js
../build/index.html 381.72 kB │ gzip: 92.59 kB
✓ built in 718ms
> jaxa-earth-api@1.0.0 build-sv
> tsc
MCP server listening on http://192.168.xxx.xxx:3001/mcp
For the 192.168.xxx.xxx part, rewrite the entry in ./src-sv/index.ts to
match your machine's IP address and network environment.
The MCP server remains running in the terminal, so press [Ctrl] + C to stop it.
The compiled files are stored in the build folder that is newly created at the project
root. The main files are as follows.
./build/index.html: The file displayed as the UI. In MCP Apps, the UI web app is bundled into a single file../build/index.js: The file for starting the MCP server.- Others: Configuration files used by the MCP server.
Registering MCP Apps with Generative AI
As of May 2026, the generative AI that supports MCP Apps and the users who can use it are limited to a few. In this case, we use Visual Studio Code. The Insiders version supports MCP Apps, and you can try it with VS Code's chat feature (GitHub Copilot Free plan) as well. Since the installation method is subject to change, please check the latest explanatory articles and other resources.
Register the URL of the MCP Apps started above with the generative AI.
http://192.168.xxx.xxx:3001/mcp
When the connection succeeds, it answers your questions using a UI like the following.
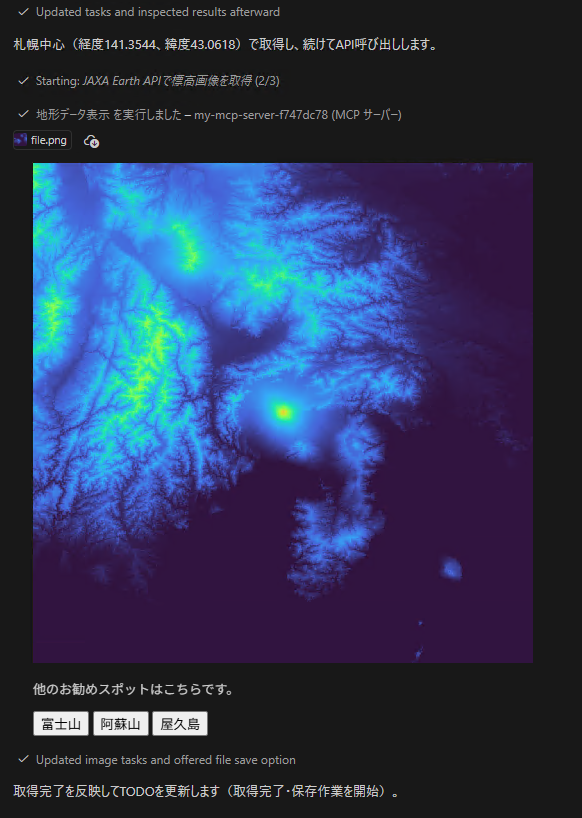
The above is a screenshot of the state after displaying the terrain data of Sapporo and then pressing the "Mt. Fuji" button. You can place buttons like these in the MCP Apps UI, and by pressing a button you can also send an additional request to the MCP server to switch the display, for example.
Next: Developing a More Practical MCP
You are now able to return strings, images, and more with MCP. Next, you will develop a practical MCP for handling Earth observation data.